Not all wheel hub servicing is old school. Some present you with a blind hole. Many newer more expensive bicycles are build using hub assemblies requiring pressed-in bearings. These hubs can create an extraction challenge that will require you to go down the blind hole.
By definition a “blind hole” refers to a hole that is reamed, drilled, or milled to a specified depth without breaking through to the other side of the work piece.
When it comes to wheels, specifically rear assemblies with free-hubs, access to the opposite side of the bearing can be near to impossible. Removal of the free-hub body may be needed and it is not always cogent. In many cases free-hubs bodies may have two pressed bearing installed and in those cases the body assembly will need to be removed.
In the profession of bicycle mechanics there are always the exception; case in point, the Fulcrum Racing 7 rear hub. The Fulcrum Racing 7 from 2015 is one of those assemblies without proper documentation, and seems to be all but ignored by its manufacturer for after sales support. To make things even more frustrating is the fact that the latest edition of Barnett’s Manual is silent in the Fulcrum line to wheel hubs.
With no worksheets for direction you find yourself looking into a blind hole.
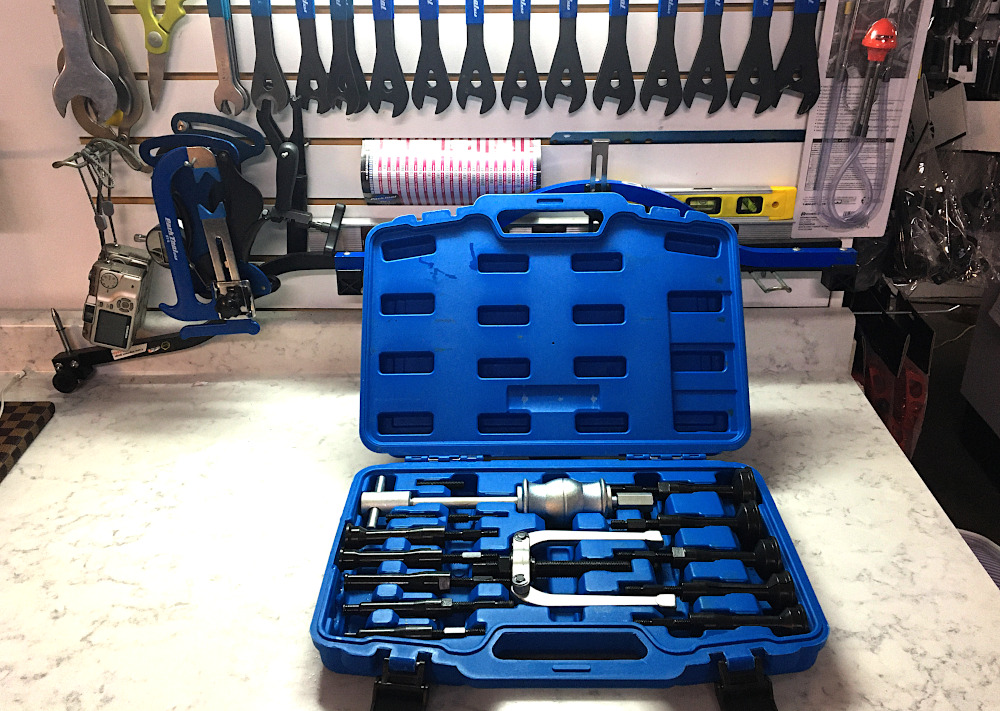
The Fulcrum 7, like many others are working with two pressed bearings, the 6000RS and 6001RS. These can be easily removed using the Blind Hole Pilot Bearing Extractor. These bearings, have an inner diameter of 10mm and 8mm. Which means you need two different sized collets for the blind hole extractor to do the job. Not a cheap tool, the blind hole extractors are sold in sets complete with slide hammers. It is very important that when sourcing one of these kits, to include collets for 8mm and 10mm. Many kits only go down to 10mm. We found a great kit from Amazon at a reasonable price. Local tool companies did not supply this tool, so online sourcing is your best bet.
The procedure for extracting these bearings are very simple:
- Access the non-drive side (or left side on front wheel) and remove the dust cap(s)
- Remove dust caps from non-drive sides.
- Loosen the lock nut, and ‘cone’.
- Pull the axle completely out. Clean all parts extracted.
- Make a note of the bearing numbers. These are located on the seal covers of the bearing.
- Using your Vernier Calipre, measure the inside diameter of the bearing.
- You may opt to apply a penetrating oil to the bearings outside diameter, but if it was properly installed that will not be necessary.
- Select the collet based on the measurement.
- Insert collet into the bearing center, (not too far) just to the same depth of the bearing thickness.
- Tighten collet just to snug.
- Thread on the slam hammer.
- Holding the wheel with your weak hand, hold the slam hammer slide at the bottom of the shaft with your strong hand and thrust up firmly. This may take one to two attempts. The bearing will extract and be firmly affixed to the collet.
The addition of a “Blind Hole Bearing Extractor” is a must have for the professional bicycle mechanic.

Brian Hahn is a fully certified professional bicycle mechanic, a former member of the PBMA and an instructor of CABS. He has been published in several publications on varied topics. Over the past six years he has taught both the BAM Certification program and the Bicycle Building and Wheel Truing Certificate courses. You can also connect with him on our Workshops throughout the year.

